Popular Posts

Sunday, 14 April 2013

Chalons – the final battle

Well after weeks of preparation, both armies were fully painted and we headed off to the Society of Ancients battle day at Sycamore Hall, Bletchley.

There were 15 games in progress, all fighting the same battle but using different rules. The only other game using 6mm figures was the battle being played under Warmaster Ancients and they had twice as many figures as we had.

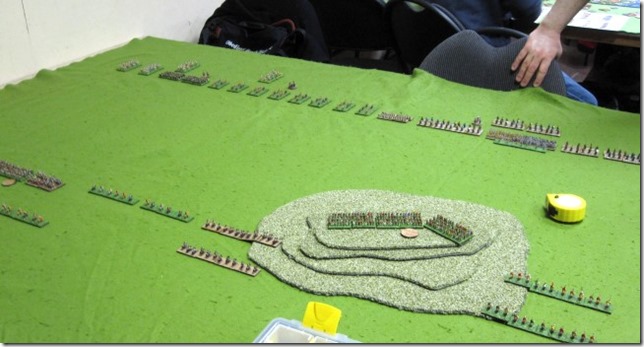
It was all very tight and we had no real space to display all the bumf that I had prepared to go with the game, but there were some railings behind the game that I managed to stick stuff on to. So it looked like this

soa_chalons01_s 

A map of the deployment. Details of the scenario, here.
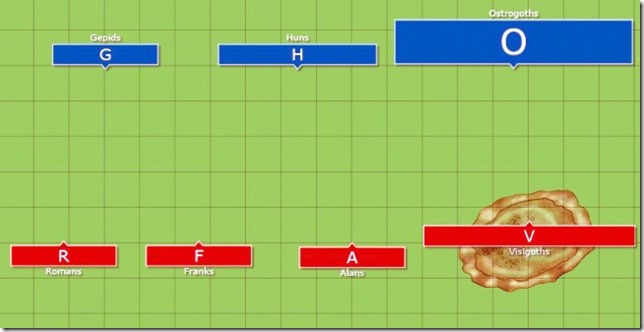
Chalons_Deployment

Now this is a picture of the first turn, a mass of Ostrogoths approaching the hill. As has been proven from previous try-outs of the battle, the best strategy is for the Ostrogoths to try and force a passage through on the right flank of the hill. This time the Ostrogoth player massed four units (of the six that he had available) of cavalry and was opposed by two units of Visigoth cavalry.

soa_chalons04_s

Contact is made, two units of Ostrogoths against one unit of Visigoths

soa_chalons05_s

Now a feature of the Die is Cast rules are that in subsequent rounds of melee, additional ranks of cavalry can join the fight, so both sides now throw in another cavalry unit each into the combat on the right of the hill.

soa_chalons06_s

The result cripples the Visigoths, although both sides lose 2 bases of cavalry in the combat, the Ostrogoths outnumber their enemies by 2:1 and so can afford to exchange losses knowing that at this rate, some of them will be left alive when all the Visigoth cavalry are dead.

soa_chalons07_s

In the next round of combat, the Ostrogoths add another unit of cavalry to the fight but still mange to lose the combat and one of their units of cavalry is forced to retreat. That still leaves three units of Ostrogoth cavalry fighting two rather beaten up units of Visigoth cavalry.

soa_chalons08_s

But the serious combat begins on the hill. It is vital for the Visigoth infantry to beat the Ostrogoth infantry before the enemy cavalry (which looks increasingly certain to win on the flank) is able to turn onto the flanks of the Visigoths and beat them. The Ostrogoths reinforced their attack with a unit of cavalry, forcing the Visigoths to stand and take the charge but cavalry attacking uphill is still not effective.

soa_chalons09_s

Although the Ostrogoths won that round of combat, it was not enough to upset the Visigoths, who were being led by their King Theoderic.

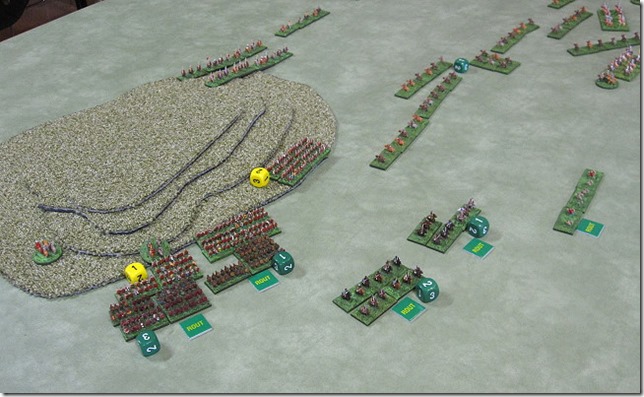
Then in the next round, the Ostrogoths throw another unit of cavalry up the hill into fresh Visigoth infantry, lose the combat and are broken. Like a wave, the fear spreads thoughout the Ostrogoths and both units of their cavalry and all their infantry flee down the hill. However on the right of the hill the Visigoth cavalry has been destroyed, leaving the flanks of the victorious infantry wide open. On the plus side, two of the Ostrogothic cavalry units are so damaged that they are blown and cannot advance further, another of their units of cavalry has headed off in wild pursuit of the routing Visigoths and the remaining Ostrogoth cavalry unit is being persuaded to stop their retreat and head back to the fight.
soa_chalons11_s

But the Huns have advanced through the centre of the Roman forces, swept the Alans aside without even having to fight them. Now they have swung round to attack the flank of the previously immobile Romans (with great success) and attack the pursuing Visigoths.

soa_chalons12_s

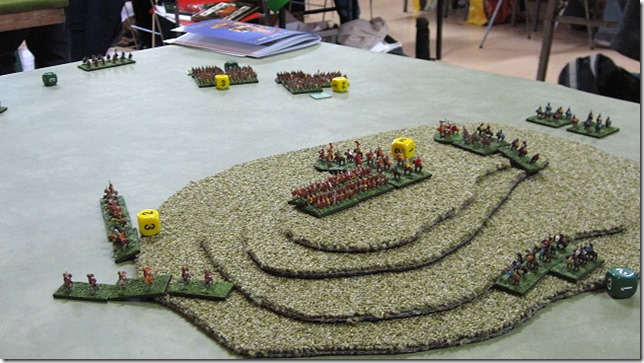
Whilst two of the Visigothic infantry units continue the pursuit of the fleeing Ostrogothic infantry – deaf to their commanders orders to halt the pursuit. The hill is now attacked from three sides and the remaining Visigoths crumble under the assault.
soa_chalons15_s

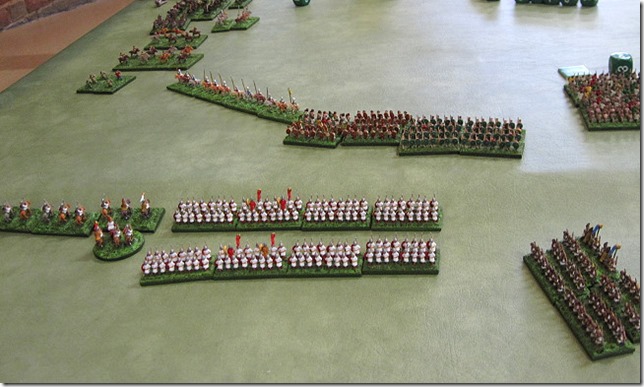
The Roman sub-commander, having led the centre is pursued and overrun with his remaining unit of cavalry, dying in sight of Aetuis now leading his legions against the Hunnic right wing.

soa_chalons16_s

soa_chalons13_s

But Aetius was unsuccessful, Gepid lancers destroyed the elite Roman cavalry and the Frank/German infantry fought the legions to a draw.

So with the hill taken by the Huns, the Roman centre smashed and the Roman left unable to make a difference, we declared the game a stunning victory to the Huns.

Why did it happen? Well the victory of the Ostrogoth cavalry on the right of the hill was the start of it. The Roman forces just cannot afford to fight a game of attrition. The Romans really need to win on the right and then be able to successfully attack the Huns in the centre and the Roman left can support them in that. But the Romans cannot win the day on their own.

In points terms the Huns have a slight advantage in points, 1800 against the Roman 1700. It might be interesting to add another 100 points of troops to the Roman side and see how an equal points battle will go.

Tuesday, 9 April 2013

Chalons a triumph, then disaster

On Good Friday we took our Chalons game down to the Wigan wargames club to try out. What happened was one of the oddest games I have yet played.


We take the battle from the point where the Visigoths have occupied the hill and the Ostrogoths have been told to take it.
So the armies of both sides are static except for the Ostrogoths on the Hunnic side. As soon as they contact the Visigoth infantry on the hill, the entire Hunnic army is released and can start moving. But if the Visigoths rout an Ostrogoth unit in combat, the entire Roman army gets released.

chalons032913_11_s


In effect this gives the Ostrogoths three choices;
1) Suicide a unit up the hill but not much of an advantage as both armies will be released.
2) Straight forward attack, straight up the hill but this tends not to work.
3) Attack round the flanks of the hill and then attack the Visigoth infantry in the flank, the most successful option.


So our experienced Ostrogothic commander attempts option 3 but is totally repulsed, the attacking Ostrogoth cavalry are broken (releasing the entire Roman force) with the Visigoth cavalry in hot pursuit.


There then followed a couple of turns of the Attila urging his compatriot to attack the hill quickly and not bother about the fancy tactics, as he was now faced with advancing Romans and little chance of stopping them if he could not move his own forces.
So the infantry attached to the Ostrogoths were sent up the hill in a rather doomed frontal attack and so it proved. At this point we were looking at an overwhelming Roman victory, the first time this had happened.


But since contact on the hill had been made, the Hunnic army was also released, some forces moving to help the Goths and the others attacking the centre.


After a couple of turns of fighting the pursuing Visigoths were stopped and indeed thrown back in disarray. With their cavalry gone the victorious Visigoths infantry flanks and rear was exposed and soon the Ostrogoth cavalry swarmed round them and started to destroy the enemy infantry.

chalons032913_15_s


In the centre the Alans fled before even making contact and a unit of Hun Noble cavalry broke through a unit of Roman allied Frank infantry, broke them, rallied immediately and then charged into the flank of some Frank cavalry which had been fighting against other Hun cavalry, breaking them immediately.

chalons032913_16_s


Only one part of the Roman army remained intact, the Roman left wing under Aetius, who were fighting rather indecisively against the Gepids. With centre gone, it was obvious that they too would be surrounded and cut to pieces.
Perhaps it was a rather impetuous Roman pursuit that was our undoing but it had all looked to be going so well, so could the Roman players be blamed for trying to take advantage of the situation.


Anyway Saturday is another day, perhaps the dice will bring a Roman victory this time.

New wargames shop in Colne, Lancashire

A friend took me to a new wargames shop, Wargames Supplies (which includes an online forum).

Tucked away at the end of a newly refurbished arcade in Colne.

Wargame Supplies Ltd
6 & 7 Shackleton Arcade
Church St
Colne
Lancashire
BB8 0LG
01282 865206

Opening hours:

Mon 11 until 4
Tues closed
Wed 11 until 9
Thurs 11 until 6
Fri 11 until 6
Sat 10 until 5
Sun 11 until 4

With a car park just across on the other side of the road.

They sell Games Workshop figures and paints, Warlord Games stuff, Privateer Press, Battlefront and Malifaux.

Gaming tables in another room.

In all very well laid out place with knowledgeable owner. Pop along and check it out for yourself.

Painting 6mm figures – for Chalons

Well the armies are now ready; 13 units of infantry, 16 units of cavalry and 12 units of skirmishers.

Two of us painting, John Holroyd and myself. It took about three weeks and it has been a long time since I last painted 6mm figures so I learned a few tricks. All the figures used were from Baccus Miniatures.

Paint consistency is vital, since you are using only a small amount of paint at a time, it dries quickly and becomes too thick to be of use. So a small pot of water near-by is handy to dip the brush into to keep the paint flowing. Very thin paint used as a wash can look very effective in this scale. Remember to keep the colours a shade lighter than you would use for larger scale figures.

You need good eye-sight, we both wore our glasses and used magnifying visors for extra vision.

You will make mistakes and splash areas you have already painted or did not intend to paint. Really its up to you, to either go back and touch that area up or ignore it and carry on.

Most of my painting was simple; undercoat the figures white and then paint over them, to create the effect. But for the commanders I used a brown ink wash over the undercoat and then painted in the areas between the ink (after it dried). It certainly does improve the look of the figures but takes a great deal more time. Since we were in a rush, the simpler technique was used for the majority of the figures.

Painting regular troops is easier, mainly they are the same. For the irregulars its a matter of mixing the colours and for this a bit of maths is handy, since the figures come in strips of 3 or 4, don’t use multiples of those numbers, instead paint every 5th, 2nd or 7th figure with a different colour for cloak or trousers. The result is a nicely ‘random’ looking unit.

So how did they come out?

The Roman army

chalons_roman_army01_s

The Hunnic army

chalons_hunnic_army01_s

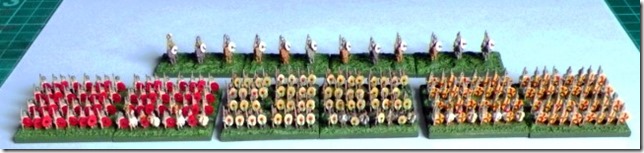
The Roman division of the Roman army

chalons_romans01_s

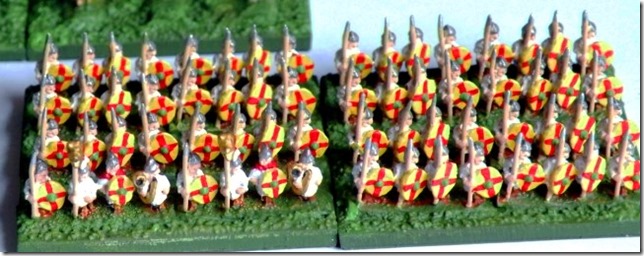
Close up on a unit of legionaries

chalons_legion01_s

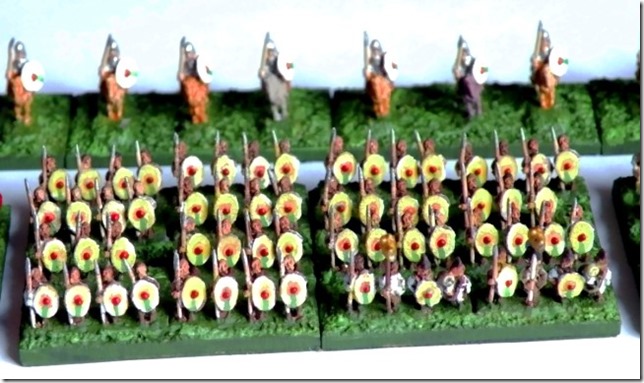
and a close up on the auxlia

chalons_auxila01_s

all the bases are standard mdf 40x20mm magnetic bases. Once the strips (or individual figures in the case of cavalry) are on the bases its a matter of putting on the flocking gel, letting it set and then painting the base. For details see this post.

So just the commanders to finish off and we will be ready to play the battle with fully painted armies.

Monday, 4 March 2013

Eye Candy from the WAB GT 2013

These are some of armies which were up for best painted army at this years Warhammer Ancient Battles Grand Tournament.
The basic pictures are small but each picture links to a much bigger picture on the internet, so click on a picture if you want to see the big version (2000 pixels wide). Pictures taken with my tiny Cannon IXUS 100, really great for pictures with poor lighting and a bit of digital touching up in PhotoImpact X3.
Mostly I have been able to get the name tag of the player and their army in the picture, so I let the pictures speak for themselves.
wabgt2013_31s

Tim Haslams Numidian army
wabgt2013_32s
 wabgt2013_33s

wabgt2013_34s
wabgt2013_35s
wabgt2013_36s
wabgt2013_37s
Wayne Richards Pontic army
wabgt2013_38s
Andreas Kkounnous Spartan army
wabgt2013_99s
Battle reports will come next.

Monday, 25 February 2013

Warmaster Ancients – the day of battle

As mentioned previously the all day WMA event took place in Preston, last Saturday.

On the day there were six players;

Steve Rowland (Chorley) Carthaginian

1510

Dan Johnson (Lancaster) Arab Conquest

1050

John Holroyd (Bolton) Sassanid Persian

775

Justin Taylor – me - (Preston) Classical Indian

765

Dave (Preston) Late Roman

630

Lee Yates (Chorley) Parthian

215

A good win there by Steve but more on that later.

Because of a double booking at Worthy Games, we had to use the small gaming room. That meant that we were limited to one 12 foot by 5 foot table,which I split into three 4 foot gaming tables. I decided to use green carpet tiles (that I had picked up at a discount carpet suppliers in Bolton) as the best surface to play on, despite being heavy to carry.

wma022313_01s

Four foot wide table were a bit cramped and gave the feeling of attacking down the floor of a mountain pass, rather than the open combats I had been hoping for. The limited frontage favoured infantry armies as it was difficult for cavalry armies to get round the enemy flanks.

But we still had some very nicely painted armies turn up. These are Dans Arab Conquest army

wma022313_02s

And Steves Carthaginians

wma022313_03s

Lees Parthians advancing in the early part of the game.

wma022313_04s

And my own Indian army advancing against Daves Late Roman army. Dave actually uses his own Indian army and so I experimented with a brigade structure that I had always thought would work well for Indians; two units of bows, backed by two units of spearmen, with single elephants in the middle and ends of the brigades. The elephants make the flanks of the brigade harder to attack and so funnel the enemy into fighting the archers and spearmen. Whilst this brigade formation was quite effective, it really lacked the ability to attack anything and with the elephants tied up supporting the infantry, I really felt that the army could have done with some heavy chariots to provide an attacking arm.

wma022313_05s

The game above (my Indians vs Daves Late Romans) was the most brutal game I played all day. Although my infantry were only really good at defending, my Indian cavalry were unleashed onto Daves archers and managed to obliterate them before attacking the flank of the legions. However the legions quickly smashed my cavalry and then went on to tear the Indian infantry to pieces. Not quite enough to win Dave the game (a win is getting the enemy army to Breakpoint or killing the enemy general) but give him another move and he would have got there.

In the first round of games Dan’s Arab Conquest army shattered Lee’s Parthians giving Dan the only really good win of the round. John’s Sassanids got a slight win against Dave’s Late Romans and my Indians beat Steve’s Carthaginians.

In the second round most of us managed to score zero points, the only exceptions being John’s Sassanids beating Lee’s Parthians and Steve beating the Late Romans.

So we went into the third round with Dan just in the lead closely followed by John but in a upset to the expected outcome, Steves Carthaginians got the only true win of the day (breaking the enemy army) against Lee’s Parthians and stormed ahead. Dan and John fought it out on the top table with Dan just scoring a few hundred points more than John to make Dan a close second behind Steve.

Lessons learned.

Well basically Dan showed us that we have been playing WMA very wrong but the lessons have been taken on board and we hope to up the game locally. I really doubt that we will get anymore interest from the local gamers in Preston but we can continue to play happilly amongst ourselves.

I think the varibale army size system was OK but next time rather than betting against the other players army bonus, I would just make it 3 cards over 3 games and each time you use a card is it ‘burned’ and cannot be used again. So the player has the choice of which bonus card to play in each of their three games.

Oh and I did not allow enough time for lunch. If I do it again, I will allow an hour.

Sunday, 20 January 2013

The intro WMA gaming day at Worthy Gaming

wma011913_01_s

wma011913_02_s

On Saturday 19th January we had the introduction day to prepare local gamers for the Warmaster Ancients to be run on Saturday 23rd February. After the day they should be happily able to play games on their own and give their opponents a decent game.

The tables were covered with carpet tiles in two different styles, green and yellow (for a desert battlefield). All tables 180x150cm.

For the first game it was easier to get all the players involved, so that everyone could learn at the same time. The match-up was Indians vs Parthians (1,000 point armies).

wma011913_03_s

The best way to attack the enemy is in the flank or rear. These Parthian horse archers got the hang of it, quickly on to the flank of these Indian infantry and whittling away at them. Using Initiative moves to get into contact, inflicting some damage (eventually they wiped out two entire Indian infantry units) and then falling back to avoid continued combat. A highly effective tactic.

wma011913_04_s

A larger view of the situation. For three moves the Indians failed to move anything in this sector of the table (the elephant on a round base is their commander Porus) and just had to take it on the chin as none of the archers had a target. Once they were able to turn and face the Parthian horse archers it was a different matter however.

wma011913_05_s

The main force of the Parthian army fights against a singe brigade of the Indian army but it does contain a unit of heavy chariots. This is the offensive part of the Parthian force and had their only two units of heavy troops, cataphracts.

wma011913_06_s

In a frontal attack against the Indians the Parthians were successful but lost almost all their cataphracts, leaving them with very little to attack with. But with wiping out the Indian brigade, the two Indian infantry units on the other side of the table all that was needed to sucure a win was to kill two more Indian units and that was done by shooting two elephants to death with massed bow fire (3 units per elephant).

Using the single elephant rules makes elephants horribly vulnerable and easy pickings if you can attack them right and so the elephants became the downfall of the Indian army.

We took a break for lunch and over the meal discussed what we would like to do to get historical gaming going at Worthy Gaming.

For the next games we split into two games; Late Romans vs Carthaginians and Parthians vs Sassanid Persians.

wma011913_11_s

Close up on the Sassanid army. The figures were only finished the night before the event, so basing still to come.

wma011913_12_s

After the first move of the Parthian army. Only one brigade got to move, the others sitting and watching. In fact falling command rolls and having blunders was a feature of this game.

wma011913_13_s

Close-up of the Parthians – 2 units of catapracts, a unit of foot archers and horse archers.

wma011913_15_s

Again the flank attack features as the tactic of the Parthian army.

wma011913_16_s

The Parthian attack certainly broke up the Sassanid brigade but at the cost of two bases of the Parthian horse archers.

wma011913_17_s

Massed combat in the centre of the table. With more heavy cavalry available the Sassanids tended to win these combats.

wma011913_21_s

The other game, Carthaginians vs Late Romans. The Romans advancing happily whilst the Carthaginians (foreground) failed to move most of the army, so ended up leading with the Gallic warband and two units of Numudian light cavalry (one unit of which has already lost a base to shooting).

wma011913_22_s