Popular Posts
-
Based on the Veni Vidi Vici rules for 18th century land battle rules, Best Allies, these rules have been modified to better reflect the tact...
-
OK this is a really old game back in 1997 when I used real film to take pictures, not a digital camera. So the pics for this have been scann...
-
Veni Vidi Vici will be presenting the Hunt the Tiger participation game, at Britcon 2016, UMIST, Manchester, M1 3NL on 13th and 14th August ...
Monday, 20 August 2012
The Die Is Cast in the style of DBA
For this we used two small armies of 12 elements a side (the sort of game you might have in DBA for example).
Greeks used 3 units each of 4 bases;
2 units of Spartans classed as; heavy infantry, armed with long spear, steady, veterans, with the phalanx and stubborn special rules.
1 unit of allied Greeks; heavy infantry, armed with long spear, average, seasoned, with the phalanx special rule
Gauls again 3 units of 4 bases but no reason to do it this way, they equally could have been 12 units, each of a single base.
3 units of Gauls; medium infantry in loose formation, javelins, sword, average, seasoned, with the wild charge special rule.
both armies deploy, the Greeks choose a double line formation to get the maximum fighting power from their long spears. The Gauls gaining no advantage from fighting more than one rank deep, deploy in single lines and overlap the Greeks line.
Both sides advance, with the allied Greek hoplites expanding into a single line to prevent the Gauls getting round the Greek flank.
In the centre a unit of Spartans declare a charge, roll; 5, 3, 3 and 2. They elect to discard the 2 (regulars roll 4 dice and chose one die to discard), so the score is 11, they are fine and charge.
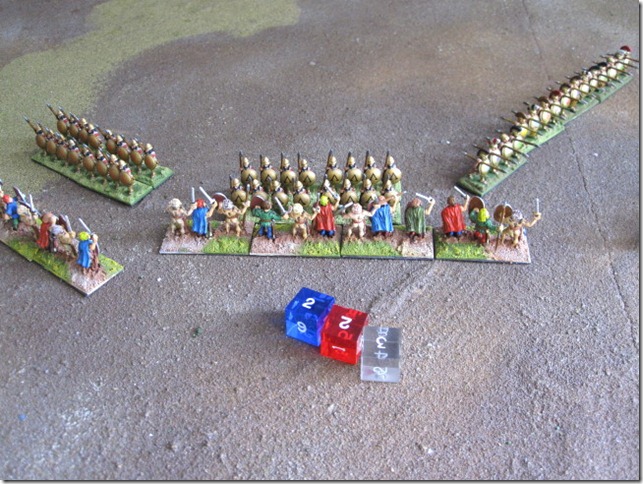
The Gauls roll miserable 7 (warriors simply roll 3 dice and use that score for their morale), become Shaken and have to take the charge at the halt.
On the Gallic left, a unit moves up and throws javelins at the second unit of Spartans. At short range (the only range close order troops can throw javelins) they need four or less to get a kill. They get 3 kills (see above) not quite enough (four hits needed to remove a base) to remove a base.
After taking casualties from shooting, the Spartans take a morale test, roll 4, 2, 2, 1 and discard the one. On a score of 8 the Spartans are happy. In the centre the Gauls inflict a single casualty on the charging Spartans, but that did not worry them either.
In the combat phase 2 bases of Spartans score a hit with every dice rolled (needing 7 or less to score a hit) the Gauls have a longer frontage, so fight back with 3 bases (6 dice) needing 2 or less to roll a hit and score one hit. That means that the Gauls lose and lose by 4 hits to 1.
Rolling a good score of 13, the Gauls modified morale total is 4 as they were Shaken and lost the melee by 4 to 1, so they Retreat.
Now the Gauls on the left are charged by the other Spartan unit. The Spartans roll 8 (discarding one of the ones) and are fine, the Gauls roll 5 (modified down to 4 because of their retreating friends) and Retreat, taking them out of the charge range of the Spartans who merely move forward.
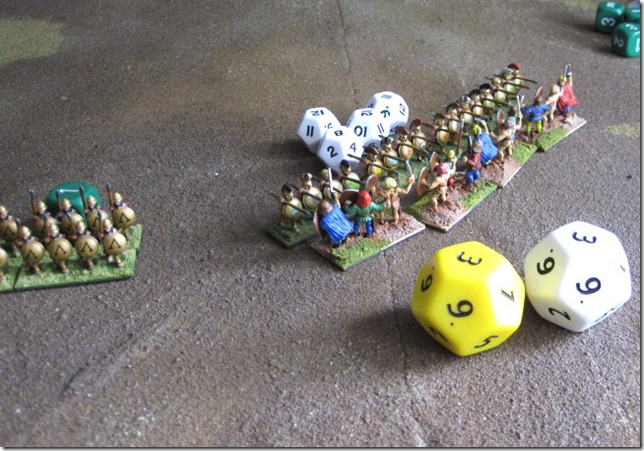
On the right, the Gauls fighting the allied Greeks cause 2 wounds for no loss. The Greeks would have needed 4’s or less to score a hit because they have no supporting rank.However the Greeks morale is fine and they are just recoiled by being beaten by 2:1 and also lose the benefit of the phalanx formation (having been recoiled).
The overall view, in the centre the Gallic unit has been heavily damaged and continues to retreat, on the left the Gauls are falling back but still quite intact, whilst on the right the Gauls are winning against the allied hoplites.
Another round of combat on the right and the Gauls score 5 hits out of 8 dice rolled. The Greeks only score one hit (the one), so are beaten by 5:1.
The Greeks rolled well and held but are now below 50% strength, so can never be considered better than Shaken and are spent as an offensive unit. The centre unit of Spartans charges into the flank of the Gauls. The result is 3:1 to the Spartans/Greeks and the allied hoplites have been saved from destruction.
On the left the other Spartans charge into the now rallied Gauls and score 4 hits (needing 7’s as they are superior troops with the support of an rank) and the Gauls score nothing. Result the Gauls are broken and run.
Game over. But remember this game was played with equal numbers of elements. If this had been done with armies using a points system then there would have been twice as many Gauls and the game could have gone very differently.
For more details of the Die is Cast rules, please follow the link to the Veni Vidi Vici website where a playtest version is freely downloadable.
Sunday, 19 August 2012
Three battles with Byzantines
My friend Steve Riley and I travelled to Rushden, Northamptonshire for the Phoenix gamers annual Warhammer Ancient Battles (WAB) event, Axes.
The tournament was for a 2100 army using the Armies of Antiquity 2 lists. Note that a 2100 point army under the new lists is worth about 1600 under the old WAB lists, so really armies were quite small.
We took a Byzantine army;
Mounted general
2 units heavy cavalry
2 units mixed spearmen (also equipped with darts) and archers
1 unit Varaginian Guard
2 units of skirmishing javelinmen (one elite with a ballistic skill of 4)
All three of the units of formed infantry have the Shieldwall special rule.
There were 17 other players, 6 of them taking Normans. Now Steve and I discussed this on the journey to the event and agreed that the best way to beat Norman knights was to shoot them, not fight them.
Game 1 vs Italian-Normans
The scenario was with a river across the table, with a ford and a bridge. Extra bonuses would be scored by capturing either or both of the crossings at the end of the game. I hate rivers in games of WAB because they stop my normal tactic of hitting the enemy in the flank. But this game was Steves to command.
Looking across the River at our Byzantine army. The Varaganians have taken advantage of their Riding Horses special rule to swiftly move up and start crossing the river at the ford. Meanwhile on the right of the picture, a unit of cavalry are heading for the bridge. We are facing an Italian-Norman army, basically Normans with some Arab allies.
How the battle looked from our side of the table. Norman knights on foot, supported by archers near the bridge with the main part of the Norman army (2 units of Arabs, 2 units of cavalry and some skirmishers near the ford).
I am afraid that the Varaginian guard were shot to death but behind them came the Byzantine spear units who swiftly engaged the Arab spearmen (see top of picture). A unit of Byzantine cavalry had chased off the enemy skirmishers and got behind the Norman knights on foot (bottom of picture) with the Byzantine skirmishers also now across the river, Hurrah!
However it all went wrong for us. Despite charging into the rear of the Norman foot knights, our cavalry was beaten and broke. Likewise the Arab infantry broke the Byzantine spearmen. But the spearmen rallied and in this picture are ready to have another go.
Towards the end of the game. In the end neither side was able to claim control of the crossing and although both sides had lost units, the Byzantine units were worth more points and so it was a slight win to the Normans. But passer-bys said that were the only army successfully to get across the river, so moral point scored.
Game 2 vs another Norman army.
This time on an open battlefield but with heavy rain falling, which limited the ability of missile armed troops to shoot. That was bad news for us as we stood little chance trying to out-fight the Norman knights.
Our opponent has massed two units of Norman knights on the right of the photo, with a large unit archers on the left and light troops coming through the woods.
Our army, with cavalry on the right and the infantry on the left. Probably precisely the wrong way round, the infantry would be much better trying to face up to the Norman charge, in shieldwall formation.
Disaster, one unit of Norman knights swept forward, crushed one unit of Byzantine cavalry, killing the general and causing half the Byzantine army to rout.
We did pull the game back slightly, rallying the heavy infantry and then counter-attacking with the Varagians but it was too little too late and the Normans had won the day big style with a maximum 32-0 victory. To make us feel a little bit better about it, quite a few Norman armies scored maximum points in the this round. With the freedom to move and a reduction in the effect of shooting, this game was where the Normans were going to excel.
Game 3 vs Arabs
This was an attacker/defender scenario, with the Byzantines acting the part of the defenders. Apparently our army had recently looted some Arab villages and the Arabs wanted their stuff back. This time I was in command and I stuck our loot behind a hill with the Varaginians on top of the hill. Either side of the hill were the two units of spearmen. The idea was that these three units provided a blocking ‘wall’ – and a wall that could shoot – whilst our cavalry and skirmishers probed any enemy advance for weakness.
Here you can see the initial Arab advance, the Byzantine cavalry are just about to charge the enemy skirmishers. They did not catch them but rather than face the charge the skirmishers broke and ran.
On the right, the Arab firepower was impressive, on the first turn the unit of Byzantine skirmishers (underlined in red) took 8 losses, reducing them to only 2 figures but those 2 figures passed their leadership test, advanced and killed an Arab horse archer before being shot down in the next round of shooting. Meanwhile the other unit of Byzantine cavalry advanced on the enemy, to drive them back and keep them away from the loot.
The Byzantine cavalry died to a man but drove off 2 units of enemy skirmishers and kept those machine gun horse archers busy. Mission successful.
On the left the Arab cavalry charged home and though it was a close fought battle, the Byzantine spearmen (in shieldwall) just gained momentum in the first round of melee. From there it was downhill for the Arab cavalry, they needed to be charging to gain the strength bonuses and they lost every round of melee after that. After 3 further rounds of combat, they broke and the Byzantine spearmen pursued, capturing the Arab unit and army standards!
In the centre, the Arab spearmen charged the Byzantine cavalry. Much to my amazement the Arab spearmen won (although only by one point) and the Byzantine general fluffed his leadership roll and the cavalry ran away – although they got away safely. At this point the Varaginians started to move off the hill to see if they could help with any of the melees.
And toward the end of the game you can see that the Arabs have been kept well away from the hill.
The final move of the game I don’t have a picture for but it was amazing. The Arab cavalry on the left had rallied but knew that they had no chance to beat the Byzantine spearmen without their standards, so wisely pulled back. The Byzantine cavalry (with the general) rallied on the right of the hill where the Arab horse archers shot at them. The Arabs caused 5 hits, all of which became wounds and I failed to make any saves at all (saving – or rather not saving – roll of 3 or more!), 5 dead Byzantine cavalry. The Byzantine cavalry unit was then reduced to a single figure, the leader plus the army general. However they passed their leadership roll and then charged the horse archers who elected to stand and fight. With only 5 attacks between them, the Byzantines inflicted 4 losses on the horse archers who now only 4 figures left themselves were forced to flee immediately.
The loss of the horse archers meant that the Byzantines had won the game with a small points advantage in losses but when captured standards and the game objective of holding on to the loot were considered it was a good 20-12 win.
Overall our army came 14th out of 18 players but we really enjoyed the days gaming. There is bound to be another Axes WAB event in 2013 and I would recommend it if you fancy a fun days ancient gaming.
The Phoenix club website is here for more information about the club.
Thursday, 2 August 2012
Second Zulu war game using Black Powder rules
For my first game of Black Powder for the Zulu war, see
http://3vwargames.blogspot.co.uk/2012/08/first-game-of-zulu-war-using-black.html
I made some tweaks to the British infantry stats, changed the brigade structure and headed down to the Portcullis Wargames Emporium in Bolton to try the ideas out.
Changes:
British infantry had their shooting and melee stats swapped. So now they roll 6 dice for shooting and 3 for melee.
The British were organised into 2 units of infantry and the (imaginary , I must find it) artillery piece as one brigade, with the two units of cavalry as another.
The Zulus also were in two brigades,; one of 3 impis and the other of 2 impis and two units of skirmishers. No rifles in any of the Zulu units.
As the mist lifted on the South African veldt, a column of British infantry are confronted by a mass of Zulu warriors - BTW this effect is easy to achieve, just walk in pouring rain to your venue and the camera lens steams up, creating the misty effect, I cleaned the lens for the next shots. The Zulus are advancing and the British are deploying out of their march columns into firing line.
John Holroyd played the British side and got lucky bringing the artillery piece into action on the first turn. However the cavalry stubbornly refused to enter the table, as we shall see.
The British firing line now formed, the Zulus are subjected to withering fire. The artillery as usual were not very effective but the rifle fire - with new stats - quickly stopped the Zulus (they became Shaken). As the Zulu player I used skirmishers to mask the artillery (which would have been much better if it had been firing into the columns of Zulus) and also made a flanking move against the British left flank. All the while expecting the British cavalry to arrive and stop me. After the British fire, the leading impi was shaken and forced to retire. However that cleared the way for the impi at the rear to charge the British line, on its own however.
After charging in, the Zulus are shaken and the combat against the British infantry is an inconclusive draw. However the flanking force charges and wipes out the artillery, leaving the flank of the British infantry exposed. And the two shaken (unengaged) impis are being rallied by their commanders.
It was a close run thing for the Zulus, all along the line they have taken heavy damage. The number on the dice indicate hits (wounds?) suffered.
With his centre unit holding the Zulus, the British commander attempts to charge his unit into the flank of the Zulus and fluffs it with a roll of 11. NOTE: however we played this wrong and the British were close enough to make an Initiative move and charge in, OK lesson learned.
The end. The flanking Zulus come round behind the British line and charge into the rear of the British line (avoiding the rifle fire that stopped their comrades). The centre British unit already having already failed one round of combat is charged in the flank by the Zulus, overwhelmed and broken. And so with 2 units of the British brigade broken, the British are destroyed and the colours lost.
The cavalry not turning up exposed the British flanks and there was no way that they were going to win. With a bit more luck (better save rolls) the Zulus might have been able to charge the front of the British line but that sort of attack was never going to succeed, the British certainly would cause any Zulus coming in at the front to be shaken and then the combat is a fairly even affair. So this game felt more like we expected a Zulu wars battle to be fought in history. Certainly the British should always win if they fight on their terms - with full artillery and cavalry support. But this scenario gives a decent chance for either side to win and certainly choices to be made with the use of troops.
A couple of shots of the Bolton shop, taken on the opening day.
Downstairs, the shop with painting table and gaming table.
and upstairs in the gaming area, another 5 tables
The Friday evening games are the club meeting of the Bolton Vikings
http://www.bolton-vikings.co.uk/Bolton_Vikings/Welcome.html
So thats it, with tweaking the British infantry stats, I think the games will work 'right' and now we can add some more and different troops and just have at it, exploring how Black Powder rules work. I have some work to do, finding those lost artillery pieces and basing up the units that I have.
First game of the Zulu war using Black Powder rules
To make the game fit better onto a 6x4 table, the size of the units has been halved and also distances. British infantry units were 12 figures strong and 6 for the cavalry. The British gun was an empty base - I have lost the gun models for the time being. Zulu main units were 20 figures.
So Mark and I divided up my small Zulu War forces as follows.
Mark (Zulus)
2 brigades of 2 units of Zulus
1 brigade of 1 unit of Zulus and 2 units of Zulu skirmishers
As the game was later to prove 2 units in a brigade is suicidal - more on that later.
Justin (British)
1 brigade of 2 units of infantry with 1 gun
1 brigade of 2 units of cavalry
We played to a scenario devised by John Holroyd (who also did the map). A disabled gun with the infantry is crossing the board and the cavalry are off doing something else, when they hear the sound of gunfire and return to aid the column. The gun needs a 5,6 to be brought into action and likewise the cavalry (although they can only start rolling on the second turn).
The British rolled first turn and deployed from column of march into firing line, ready for the Zulus. Now in BP, you roll for each brigade (or unit in a brigade) to be able to move, if you roll really well, then you can make up to 3 moves and the Zulus rolled well. At the end of the first turn, the Zulus were in range to charge the British in the next turn, with more forces swinging round the flanks. British rifle fire was largely ineffective.
The Zulus charge and the battle hots up (we used Gale Force 9 blue wound markers to record the damage on units). 3 wounds means that a unit is shaken, fights at reduced effectiveness and cannot be given any orders, it is really useless until rallied. The British rolled well, getting the (imaginary) gun into action and the cavalry arrived on table, moving the 3 move maximum allowed. The Border horse had a special rule allowing them to operate well away from their brigade commander. So a unit of cavalry was sent against each flanking force of Zulus.
The British infantry fought hand-to-hand vs the Zulus and although hard hit managed to win one of the combats and drive the Zulus off (and destroy them).
With incredible dice rolls the British cavalry suffered no damage from the Zulu skirmishers but neither could they pass a roll to charge (our fault not the rules, the rules actually allow an Initiative move if the enemy is close enough).
Freed of their enemy to the front, a unit of British infantry, wheels round to add their firepower to the Border Horse. The Zulus are held (shaken) but not broken.
On the other flank, with an insanely good dice roll, one of the Zulu units hits a unit of British infantry who were rallying after their last combat. Hit in the flank is bad news and the British have no chance to fire as the Zulus sweep in.
On the right flank, the Zulus also charge, into the Border horse and against the British infantry. The infantry are too far away and the Zulus fail to charge in. Although the Zulus contact the Border horse, they are shaken by the shooting as they go in and their fighting ability is greatly reduced.
Short range fire from the British infantry.
The lancers finally charge into the flank of the Zulus. This is lethal but helped by the British infantry (needing 5 or more to get hits) rolling 6 out of 6 hits. Nothing the Zulus can do will match that and the last Zulu impi on the left is destroyed.
The Zulu skirmishers take on the 'easy meat' of the artillery crew, get a few hits with close range fire but the artillery roll well and no serious harm is done.
And on the right an advance by the Border horse and a unit of British infantry finished off the Zulus.
Conclusions
Certainly it was a fun game. It was also very fast once we had learnt the basics of the game. Finding the rule you wanted was not easy. I had forgotten my copy of the rules, so I have not yet marked it as I am wont to do with a set of rules.
It is a game of luck, no doubt about it. Loads of dice and if you roll well you are going to do well - so not a game for someone who wants to plan the game ahead.
The Zulus might have won in the centre if the attack line had been supported (with more units behind), so a lesson for the next game?
Also brigades of 2 units are crazy. Lose one of the two units and the other will withdraw. So bigger tougher brigades are needed.
Now the big problem seems to be with the stats of the British infantry - don't get me wrong they are as hard as nails - but in this game, their shooting merely tickled the Zulus and they out-fought the Zulus in combat. So for the next game we plan to reverse the stats for the British infantry, they will get 6 attacks for shooting and 3 for combat. Lets see how that works.